DIY Seashell Wall Art Easy Coastal Decor Ideas
Transform your space with DIY seashell wall art—a simple, budget-friendly way to bring coastal charm indoors. Whether you’re crafting a full gallery wall or a single statement piece, these easy projects use natural shells, frames, and paint to create beautiful, personalized decor that captures the serene vibe of the seaside.
Key Takeaways
- DIY seashell wall art is affordable and eco-friendly: Use collected or store-bought shells to reduce waste and save money.
- No beach trip required: Many craft stores and online retailers sell a variety of shells perfect for crafting.
- Customizable to any style: From minimalist to boho, seashell art fits seamlessly into modern, rustic, or traditional interiors.
- Beginner-friendly projects: Most designs require only basic tools like glue, frames, and paint.
- Perfect for seasonal updates: Swap out colors or arrangements to match summer vibes or holiday themes.
- Adds texture and dimension: The 3D nature of shells creates visual interest that flat art can’t match.
- Great for gifting: Handmade seashell art makes a thoughtful, personal present for housewarmings or birthdays.
Quick Answers to Common Questions
Can I use fake seashells for wall art?
Yes! Fake seashells made from resin or plastic are lightweight, durable, and come in consistent shapes and colors. They’re a great option if you want a specific look or are concerned about the fragility of real shells.
How do I hang heavy seashell art safely?
Use sturdy picture hangers, wall anchors, or Command strips rated for the weight. For very heavy pieces, consider using a French cleat system or consulting a professional for secure mounting.
Can I paint real seashells?
Absolutely! Use acrylic paints and a small brush for best results. Seal with a clear matte or glossy varnish to protect the finish and enhance durability.
What’s the best glue for attaching shells to wood?
E6000 craft adhesive or epoxy glue works best for bonding shells to wood. Both are strong, waterproof, and dry clear. Avoid regular school glue, as it may not hold over time.
How do I prevent shells from yellowing over time?
Keep your art out of direct sunlight and high humidity, which can cause discoloration. If using real shells, avoid excessive bleach during cleaning, as it can weaken the material.
📑 Table of Contents
Why DIY Seashell Wall Art Is the Perfect Coastal Decor
There’s something undeniably calming about the ocean—the sound of waves, the smell of salt air, the feel of sand between your toes. But you don’t need to live by the shore to bring that peaceful coastal energy into your home. DIY seashell wall art is a simple, beautiful way to infuse your space with beachy vibes, no matter where you live.
Whether you’re redecorating your entire living room or just looking for a fun weekend project, seashell wall art offers endless creative possibilities. It’s not just about hanging up a few shells—it’s about crafting a piece that tells a story. Maybe it’s a collection from a memorable beach vacation, or a carefully arranged mosaic that mimics the colors of a sunset over the water. The best part? You don’t need to be an artist or a professional crafter to make something stunning.
The Appeal of Natural Materials
Using real seashells in your decor connects your home to nature in a tangible way. Each shell has its own unique shape, texture, and color, making every piece of art one-of-a-kind. Unlike mass-produced decor, DIY seashell wall art feels personal and authentic. It’s a celebration of the ocean’s beauty, transformed into something you can enjoy every day.
Plus, working with natural materials is inherently sustainable. If you collect your own shells (ethically and legally, of course), you’re reusing something that would otherwise wash up on shore. Even if you buy shells, many suppliers source them responsibly, so you can feel good about your purchase.
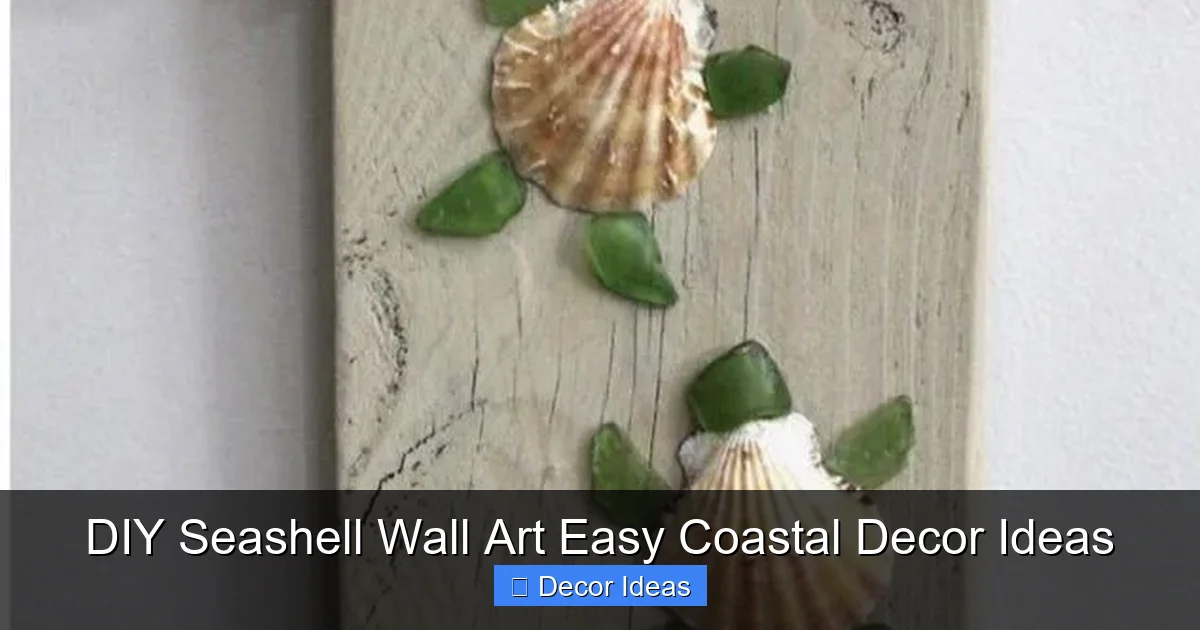
Getting Started: What You’ll Need
Visual guide about DIY Seashell Wall Art Easy Coastal Decor Ideas
Image source: i.pinimg.com
Before you dive into your first project, it’s important to gather the right supplies. The good news? Most of what you need is probably already in your craft drawer or hardware store.
Essential Materials
- Seashells: You can collect these yourself or buy them in bulk online or at craft stores. Look for a mix of sizes and types—clam shells, scallop shells, sand dollars, and starfish add variety.
- Picture frames: Choose frames that match your style. Shadow boxes work especially well because they allow depth for 3D arrangements.
- Adhesive: Strong craft glue like E6000 or hot glue works best for attaching shells to surfaces.
- Paint and brushes: Optional, but great for adding color or highlighting details.
- Backing material: Canvas, wood, or foam board can serve as the base for your design.
- Tools: Tweezers, toothpicks, and a small hammer (for breaking larger shells) can help with precision.
Optional Upgrades
Want to take your project up a notch? Consider adding:
– LED string lights: Tuck them behind the shells for a soft glow.
– Driftwood or coral: Combine with shells for a more dynamic composition.
– Seashell stamps or stencils: Use these to paint shell patterns on the background.
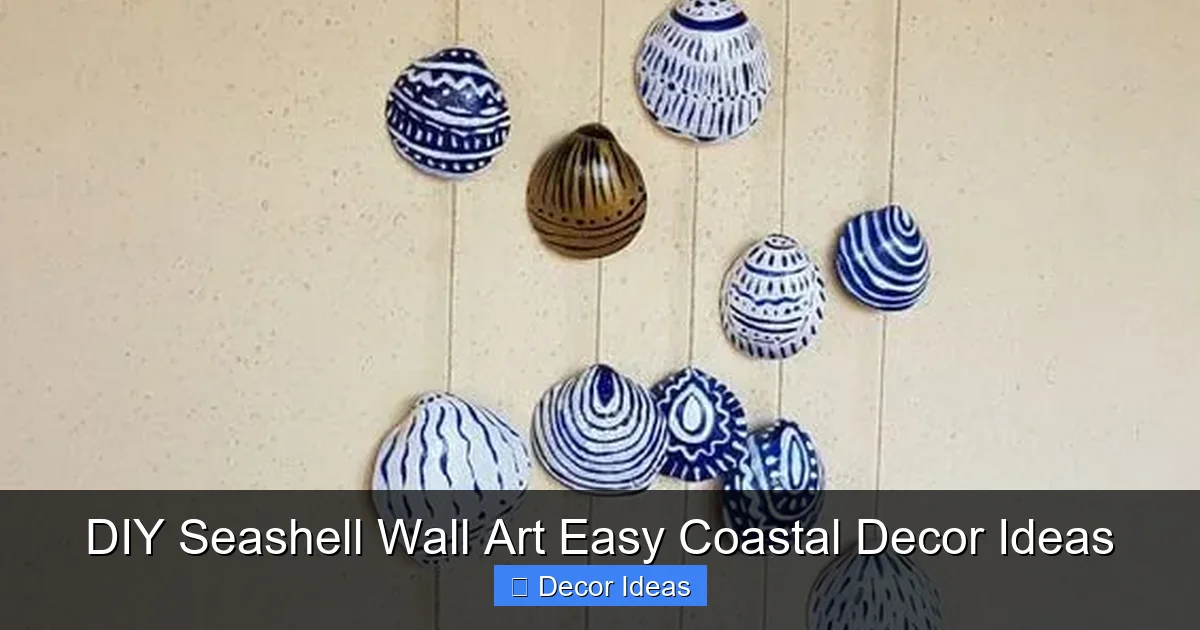
5 Easy DIY Seashell Wall Art Projects
Visual guide about DIY Seashell Wall Art Easy Coastal Decor Ideas
Image source: i.pinimg.com
Now that you’re equipped with the basics, let’s explore some fun and simple projects you can try at home. These ideas range from beginner to intermediate, so there’s something for everyone.
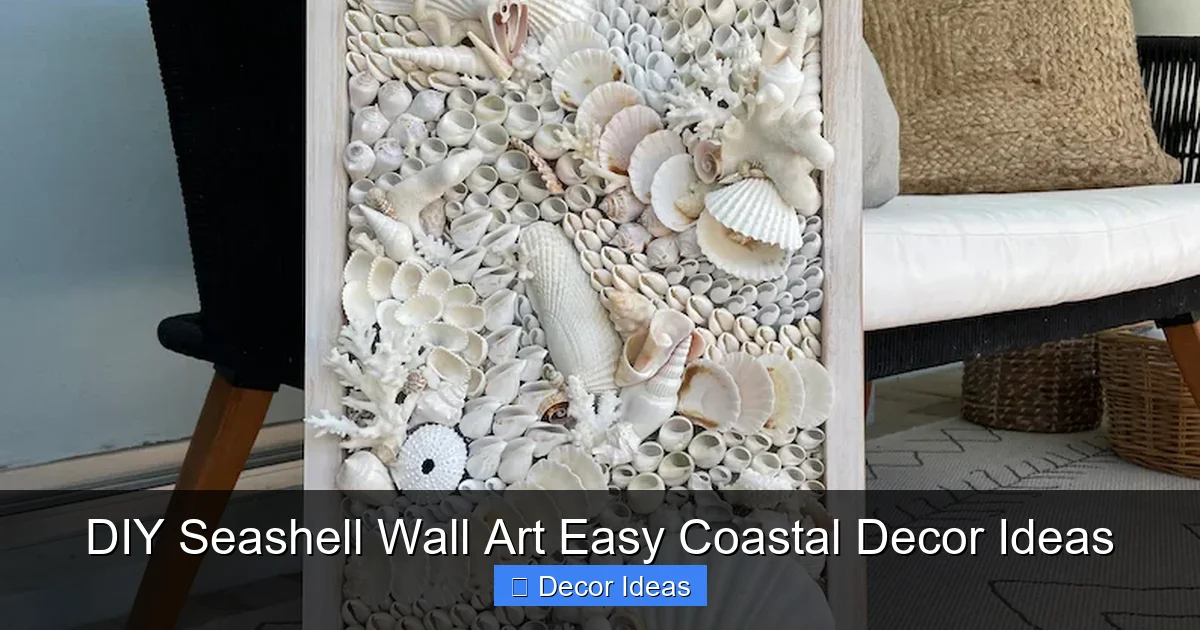
1. Framed Shell Collage
This is the most straightforward project and perfect for beginners. Start by selecting a frame—any size will do. Remove the glass and backing, then lay your shells on the cardboard or foam board inside. Play around with the arrangement until you’re happy with the layout. Once you’ve found the perfect design, glue each shell in place using a strong adhesive.
Tip: Group similar-sized shells together for a clean look, or mix sizes for a more organic, beachy feel. You can also paint the background in soft blues, whites, or sandy beige to enhance the coastal theme.
2. Seashell Wreath
Turn your wall into a coastal gallery with a seashell wreath. Start with a foam or wire wreath form. Using hot glue, attach shells all around the ring, overlapping them slightly to create a full, textured look. Add smaller shells or starfish in the center for a focal point.
Hang it on a door or wall using a ribbon or fishing line. This project is especially lovely in entryways or above a console table. For a seasonal twist, paint some shells in pastel colors for Easter or add red and white shells for a nautical Christmas.
3. Monogram or Word Art
Personalize your decor by spelling out a name, initial, or word like “HOME” or “BEACH” using shells. Use a stencil or print out a letter template to guide your design. Glue small shells along the edges of each letter, or fill them in completely for a bold look.
This project makes a great gift for newlyweds or new homeowners. Pair it with a wooden sign or hang it on a painted canvas for extra charm.
4. Ocean-Inspired Mosaic
For a more advanced project, try creating a mosaic that mimics the ocean. Use a large canvas or wooden board as your base. Paint the background in shades of blue and green to represent water. Then, arrange shells in patterns—waves, ripples, or even a school of fish—using smaller pieces to fill in gaps.
You can break larger shells with a hammer and tweezers to create custom shapes. This technique adds depth and realism, making your artwork look like a piece of the sea itself.
5. Floating Shell Display
Use a deep shadow box frame to create a “floating” effect. Glue shells to the back of the frame, then layer smaller pieces in front. The depth gives the illusion that the shells are suspended in air.
This style works beautifully in bathrooms or bedrooms, where soft lighting can highlight the textures. Add a few dried sea sponges or pieces of coral for extra dimension.
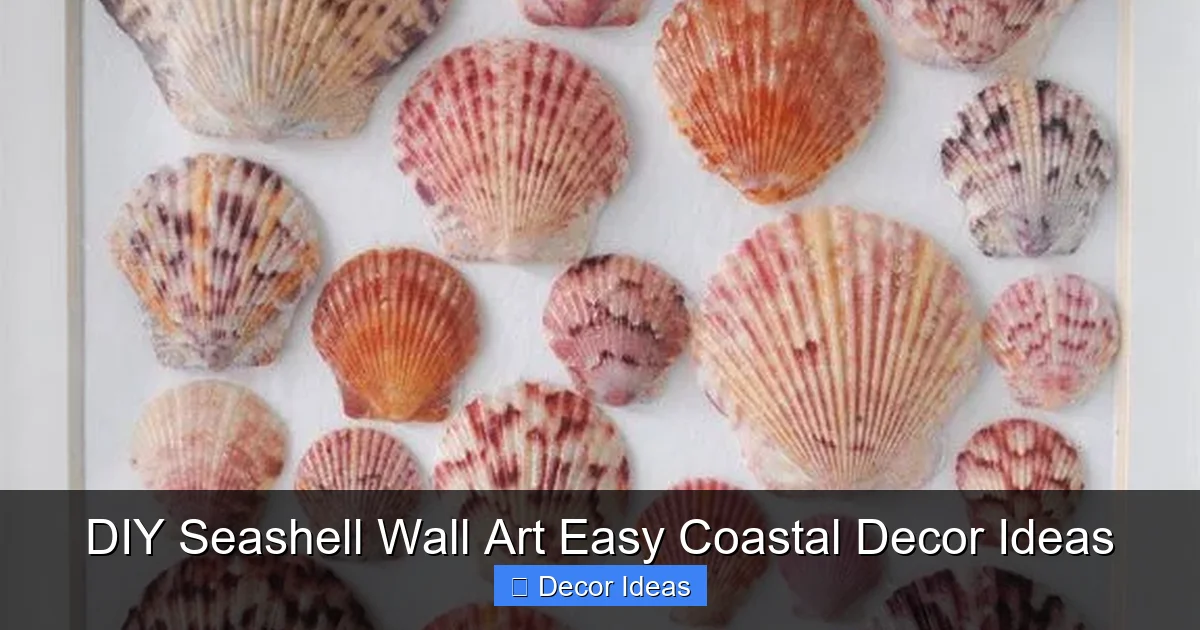
Tips for Designing Your Perfect Piece
Visual guide about DIY Seashell Wall Art Easy Coastal Decor Ideas
Image source: i.pinimg.com
Creating beautiful DIY seashell wall art isn’t just about gluing shells to a board—it’s about composition, balance, and personal style. Here are some expert tips to help you design a piece you’ll love.
Play with Symmetry and Asymmetry
Symmetrical designs feel calm and orderly—perfect for a minimalist or modern space. Try arranging shells in a perfect circle or mirroring shapes on either side of a center point.
Asymmetrical layouts, on the other hand, feel more organic and dynamic. They mimic the randomness of nature and work well in boho or eclectic interiors. Don’t be afraid to let your arrangement feel a little “messy”—that’s part of its charm.
Consider Color and Texture
While natural shells have their own beauty, painting them can help tie your piece into your existing decor. Use acrylic paints in soft pastels, metallics, or even bold colors for a pop. Gold or silver paint on the edges of shells adds a touch of elegance.
Mix textures too—smooth clam shells, ridged conchs, and spiky sand dollars all add visual interest. The contrast keeps the eye moving and makes the artwork more engaging.
Think About Scale and Placement
A small cluster of shells might get lost on a large wall, while a huge piece could overwhelm a tiny space. Consider the size of your wall and furniture when choosing your project.
Hang your art at eye level—about 57 to 60 inches from the floor—for the best viewing experience. If you’re creating a gallery wall, plan the layout on the floor first, then mark the wall with painter’s tape before hanging.
Where to Find Seashells (And How to Clean Them)
You don’t need to live by the beach to find beautiful shells. Here are some great sources:
Beachcombing
If you’re lucky enough to live near the coast, take a walk after a storm or at low tide. You’ll often find the best shells washed up on the shore. Always check local regulations—some beaches prohibit shell collecting to protect marine life.
Craft Stores and Online Retailers
Stores like Michaels, Hobby Lobby, and Amazon carry a wide variety of shells in different sizes and types. Buying online is convenient, especially if you need a specific quantity or style.
Cleaning Your Shells
If you collect your own shells, they’ll need cleaning before use. Rinse them in fresh water to remove sand and debris. For a deeper clean, soak them in a mixture of water and mild bleach (1 part bleach to 9 parts water) for 10–15 minutes. Rinse thoroughly and let them dry completely in the sun.
Avoid boiling shells, as this can cause them to crack or lose their luster.
Styling Your Seashell Wall Art in Your Home
Once your masterpiece is complete, it’s time to show it off! Here’s how to style it for maximum impact.
In the Living Room
Hang a large seashell collage above your sofa or fireplace. Pair it with woven baskets, jute rugs, and linen throw pillows to enhance the coastal vibe. Add a few nautical accents like a ship wheel or anchor for a classic beach house look.
In the Bedroom
Create a calming retreat with soft, neutral-toned shell art. A small wreath or monogram above the bed adds a personal touch. Use sheer curtains and white bedding to keep the space light and airy.
In the Bathroom
Seashell art is a natural fit for bathrooms. A floating shell display or mosaic can complement a spa-like atmosphere. Add candles, eucalyptus, and a wooden stool for a luxurious feel.
As Part of a Gallery Wall
Mix your seashell art with framed photos, coastal prints, and driftwood pieces. Vary the sizes and shapes of the frames for a dynamic look. Keep the color palette cohesive—whites, blues, and natural wood tones work best.
Conclusion: Bring the Beach Home
DIY seashell wall art is more than just a craft project—it’s a way to connect with nature, express your creativity, and transform your space into a serene coastal haven. Whether you’re making a simple framed collage or an intricate mosaic, the process is as rewarding as the result.
With just a few shells, some glue, and a little imagination, you can create decor that’s uniquely yours. So gather your materials, let your creativity flow, and bring a piece of the ocean into your home. After all, every shell has a story—and now, so will your walls.
🎥 Related Video: DIY Sea shell mosaic | sea shell crafts #art #diy #seashell #diydecor #craft #seashellart #walldecor
📺 Crafts Enclave
shortsfeed #trending #shortsviral #diycrafts #fyp #trendingshorts #woodcraft #shorts #viralshorts #recycle #beach #beachart …
Frequently Asked Questions
Do I need to seal my seashell wall art?
Sealing isn’t always necessary, but it can protect painted shells and add a polished finish. Use a clear acrylic sealer for best results, especially in high-moisture areas like bathrooms.
Can I make seashell art with kids?
Yes! Simple projects like shell collages or painted wreaths are great for children. Use non-toxic glue and supervise when handling small shells or tools.
What size frame is best for a beginner project?
A 8×10 or 11×14 inch frame is ideal for beginners. It’s large enough to create a nice arrangement but small enough to manage easily.
How long does it take to make DIY seashell wall art?
Most projects take 1–3 hours, depending on complexity. Allow extra time for glue to dry and paint to set.
Can I use seashell art outdoors?
It’s not recommended unless sealed with a weatherproof coating and placed in a sheltered area. Moisture and sun can damage shells and adhesives over time.
Where can I find free seashell templates?
Search online for “free seashell SVG” or “printable shell stencils.” Websites like Pinterest, Etsy (free section), and Canva offer downloadable designs you can print and trace.