Create Stunning DIY Large Wall Art on a Budget
Transform your blank walls into eye-catching focal points without spending a fortune. With a little creativity and basic supplies, you can craft beautiful DIY large wall art that reflects your personal style and elevates any room.
Key Takeaways
- Affordable materials: Use budget-friendly items like canvas, fabric, wood, or even recycled objects to create impressive large wall art.
- Personalized style: DIY projects let you match your art to your home’s color scheme, theme, or mood—perfect for any decor style.
- Easy techniques: No advanced skills needed—painting, stenciling, fabric wrapping, and wood burning are beginner-friendly options.
- Custom sizing: Make your art as big or small as you want, ensuring it fits perfectly above your sofa, bed, or entryway.
- Eco-friendly options: Repurpose old frames, wood scraps, or fabric remnants to reduce waste and save money.
- Quick updates: Swap out your wall art seasonally or for holidays to refresh your space without a full redecorating project.
- Confidence boost: Completing a DIY project gives you a sense of accomplishment and a unique piece you’ll love showing off.
Quick Answers to Common Questions
What’s the cheapest way to make large wall art?
Use a large canvas from a dollar store, leftover paint, and painter’s tape to create geometric designs. Total cost can be under $15.
Can I make large wall art without painting?
Absolutely! Try fabric wrapping, wood burning, or collage techniques that don’t require paint.
How do I hang heavy DIY wall art safely?
Use heavy-duty picture hangers, D-rings, or French cleats. Always check the weight limit and anchor into wall studs if possible.
What size should my large wall art be?
It should cover about two-thirds to three-fourths of the wall width, especially above furniture like a sofa or bed.
Can I update my DIY wall art later?
Yes! Paint over it, re-wrap it with new fabric, or add new elements to keep it fresh and seasonal.
📑 Table of Contents
- Why DIY Large Wall Art Is the Smart Choice for Your Home
- Getting Started: Planning Your DIY Large Wall Art Project
- Top DIY Techniques for Creating Large Wall Art
- Budget-Friendly Tips to Maximize Your Savings
- Hanging and Displaying Your DIY Large Wall Art
- Maintaining and Updating Your Wall Art
- Final Thoughts: Your Wall, Your Rules
Why DIY Large Wall Art Is the Smart Choice for Your Home
Let’s face it—blank walls can make a room feel empty, cold, or unfinished. But hiring an artist or buying expensive gallery prints isn’t always in the budget. That’s where DIY large wall art comes in. Not only is it cost-effective, but it also lets you express your personality and creativity in a way store-bought decor simply can’t match.
Creating your own large wall art means you control every detail—from size and color to texture and theme. Whether you’re into modern minimalism, boho charm, or rustic farmhouse vibes, you can design a piece that truly fits your space. Plus, the process is surprisingly fun and rewarding. You don’t need to be a professional artist to make something beautiful. With a few simple tools and a little imagination, you can turn a plain wall into a stunning visual centerpiece.
Getting Started: Planning Your DIY Large Wall Art Project
Before you grab your paintbrushes or hammer, take a moment to plan. A little prep goes a long way in ensuring your project turns out exactly how you envision it. Start by measuring the wall space where you want to hang your art. A large piece should typically cover about two-thirds to three-fourths of the wall width—especially above furniture like a sofa or bed.
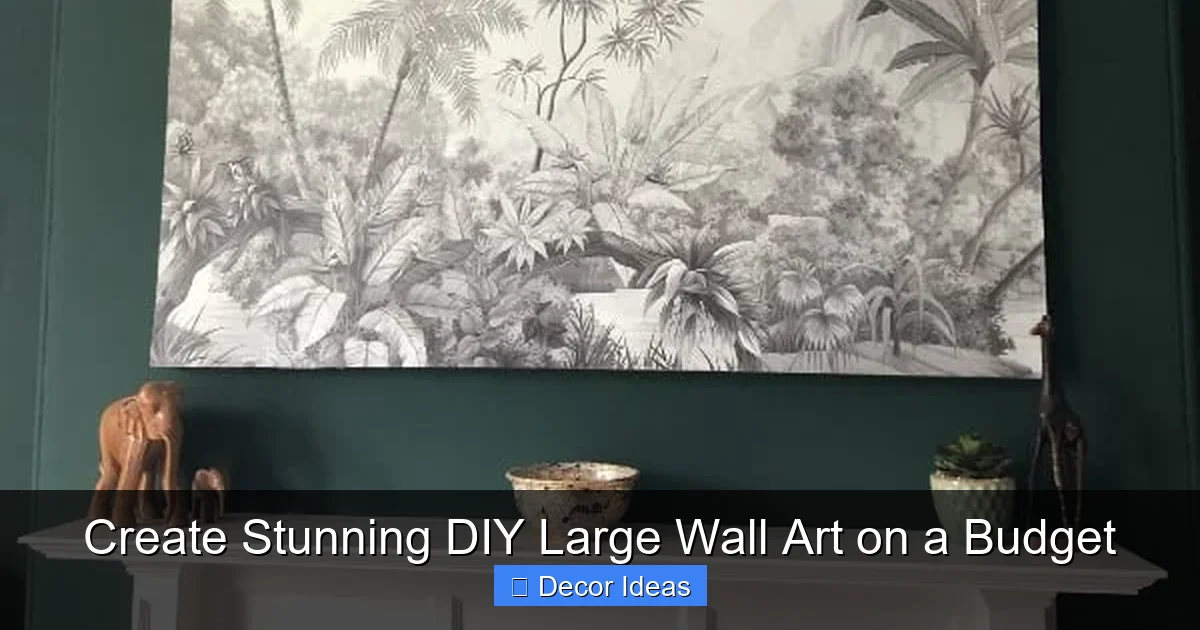
Visual guide about Create Stunning DIY Large Wall Art on a Budget
Image source: upcyclemystuff.com
Choose the Right Size and Shape
Oversized art makes a bold statement, but it needs to be proportional. For example, a 48” x 72” canvas works well above a queen-sized bed, while a 60” x 40” piece might suit a long living room wall. Consider whether you want a single large panel or a gallery-style arrangement of smaller pieces grouped together. The latter can be easier to manage and offers more creative flexibility.
Pick a Style That Matches Your Space
Think about your room’s existing decor. A sleek, geometric design might complement a modern living room, while a textured fabric tapestry could enhance a bohemian bedroom. If you’re unsure, start with a neutral base—like white, gray, or beige—and add pops of color that match your throw pillows or rug. This ensures your art feels cohesive, not chaotic.
Gather Your Tools and Materials
Most DIY large wall art projects require just a few basic supplies. Here’s a quick checklist:
- Large canvas, plywood panel, or stretched fabric
- Acrylic paints, brushes, and painter’s tape
- Sandpaper (for wood projects)
- Stencils, sponges, or sponges for texture
- Command strips or heavy-duty picture hangers
- Optional: wood burning tool, fabric glue, or spray paint
Many of these items can be found at dollar stores, craft shops, or even repurposed from around your home. The key is to work with what you have and keep costs low.
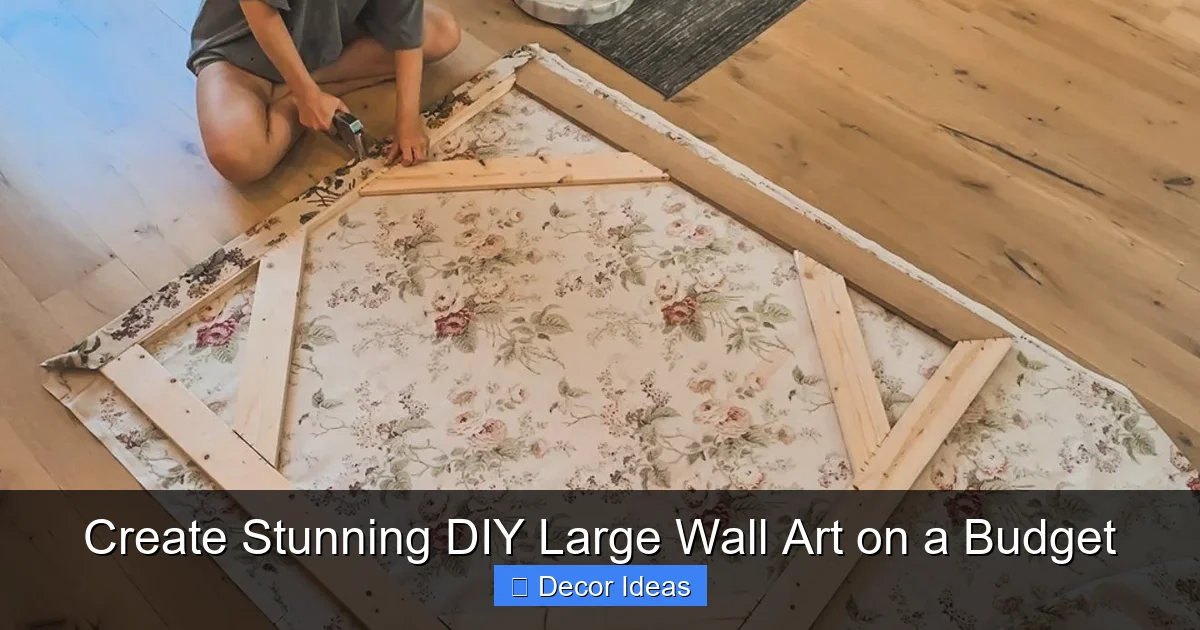
Top DIY Techniques for Creating Large Wall Art
Now for the fun part—making your art! There are dozens of techniques to choose from, depending on your skill level and desired look. Below are five popular and beginner-friendly methods that deliver professional results without the price tag.
Visual guide about Create Stunning DIY Large Wall Art on a Budget
Image source: i.pinimg.com
1. Abstract Paint Pouring
Paint pouring is a mesmerizing technique that creates fluid, marbled designs with minimal effort. All you need is acrylic paint, pouring medium (or dish soap and water), cups, and a large canvas. Mix your paints with the medium, layer them in a cup, then flip the cup onto the canvas and lift it slowly. Tilt the canvas to spread the paint and watch the colors blend into stunning organic patterns.
Pro tip: Use a heat gun or blow dryer to pop air bubbles and create more movement in the paint. Let it dry completely before hanging.
2. Geometric Stenciling
For a clean, modern look, try geometric stenciling. Use painter’s tape to create shapes like triangles, hexagons, or chevrons on a large canvas or wooden panel. Paint over the tape with a roller or sponge, then carefully remove the tape to reveal sharp, defined lines. You can stick to one color for a subtle effect or use multiple hues for a vibrant, dynamic piece.
Pro tip: Start with light colors and build up to darker shades for better coverage and fewer mistakes.
3. Fabric-Wrapped Canvas
If you’re not into painting, fabric wrapping is a fantastic alternative. Choose a bold textile—like linen, burlap, or patterned cotton—and stretch it tightly over a large canvas frame. Secure it on the back with a staple gun, folding the edges neatly like wrapping a present. This method adds texture and softness to your wall and works especially well in bedrooms or cozy living spaces.
Pro tip: Use fabric remnants from old curtains or clothing to save money and add a personal touch.
4. Wood Slice or Plywood Art
For a rustic or natural vibe, use a large piece of plywood or a tree slice (available at craft stores). Sand the surface smooth, then paint, stain, or burn designs into the wood using a wood burning tool. You can create mandalas, landscapes, or even inspirational quotes. Seal with a clear coat to protect the finish.
Pro tip: Look for discounted or damaged wood at hardware stores—often sold as “seconds” but perfect for art projects.
5. Collage and Mixed Media
Got old magazines, photos, or wallpaper samples? Turn them into a large-scale collage. Arrange your materials on a canvas or board, then glue them down with Mod Podge or craft glue. Add paint, markers, or washi tape for extra flair. This technique is great for storytelling or creating a nostalgic, eclectic vibe.
Pro tip: Use a sealant spray to protect your collage and give it a unified finish.
Budget-Friendly Tips to Maximize Your Savings
One of the biggest perks of DIY large wall art is how affordable it can be. With a little creativity, you can create a masterpiece for under $30—sometimes even less. Here’s how to stretch your dollar without sacrificing style.
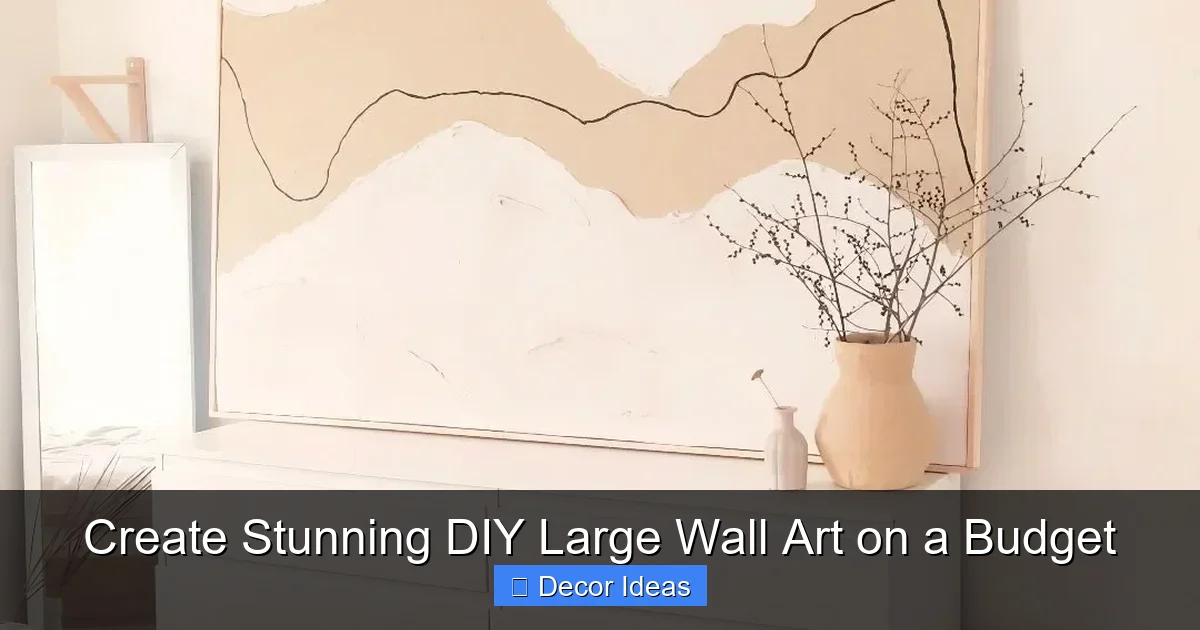
Visual guide about Create Stunning DIY Large Wall Art on a Budget
Image source: cdn.diycraftsy.com
Shop Smart for Supplies
Check out dollar stores, thrift shops, and online marketplaces like Facebook Marketplace or Craigslist for discounted canvases, frames, and tools. Many people sell unused art supplies for pennies on the dollar. You can also ask friends or family if they have leftover paint or fabric lying around.
Repurpose and Upcycle
Before buying new, look around your home for items you can repurpose. An old door can become a rustic wall hanging. A damaged mirror frame can be painted and turned into a unique art base. Even cardboard boxes can be layered and painted to create lightweight, large-scale pieces.
Use What You Already Have
Do you have leftover paint from a previous project? Perfect! Use it as your base color. Have extra yarn or string? Try creating a macramé wall hanging. The more you use existing materials, the more you save—and the more personal your art becomes.
DIY vs. Buying: The Cost Comparison
Let’s do a quick comparison. A large, framed abstract print from a home decor store might cost $150–$300. For the same size, you could buy a blank canvas for $15, paint for $10, and tape for $3—total: $28. That’s a savings of over $120! Plus, you get the satisfaction of saying, “I made that.”
Hanging and Displaying Your DIY Large Wall Art
Once your masterpiece is complete, it’s time to hang it up. But large art requires a bit more care than a small photo frame. You want it to stay secure and level—no one wants a crooked or fallen piece.
Choose the Right Hanging Hardware
For heavy pieces like wood or large canvases, use heavy-duty picture hangers, D-rings, or French cleats. These distribute the weight and prevent damage to your wall. If you’re renting or don’t want to drill holes, try Command Strips designed for heavy items (check the weight limit!).
Find the Perfect Height
The general rule is to hang art so the center is at eye level—about 57 to 60 inches from the floor. But for large pieces above furniture, adjust slightly higher so it doesn’t feel cramped. Step back and look at the overall balance before committing.
Create a Gallery Wall
If one large piece feels too bold, consider a gallery wall with several smaller DIY artworks. Use a mix of sizes, frames, and styles for visual interest. Lay everything out on the floor first to plan the arrangement, then hang with care.
Maintaining and Updating Your Wall Art
Your DIY large wall art doesn’t have to be permanent. One of the best things about making it yourself is the freedom to change it up whenever you want. Swap out seasonal themes—like autumn leaves in fall or florals in spring—or refresh the colors to match a new decor trend.
To keep your art looking fresh, dust it regularly with a soft cloth. If it’s painted, avoid direct sunlight to prevent fading. And if you ever get bored of it, simply paint over it or re-wrap it with new fabric. The possibilities are endless!
Final Thoughts: Your Wall, Your Rules
Creating DIY large wall art is more than just a decorating project—it’s a chance to express yourself, save money, and add warmth to your home. You don’t need a fancy studio or expensive tools. All you need is a little time, some basic supplies, and the courage to try something new.
So go ahead—grab that canvas, pick up a brush, and start creating. Whether it’s a bold abstract splash, a serene nature scene, or a textured fabric masterpiece, your wall deserves something uniquely yours. And the best part? You’ll love it even more because you made it yourself.
🎥 Related Video: DIY OVERSIZED WALL ART from a Shower Curtain!!
📺 DIY Dream Home with Cara Newhart
Frequently Asked Questions
What materials do I need for DIY large wall art?
Basic supplies include a large canvas or wood panel, acrylic paint, brushes, painter’s tape, and hanging hardware. Optional items include stencils, fabric, or a wood burning tool, depending on your chosen technique.
Is DIY wall art difficult to make?
Not at all! Many techniques like paint pouring, stenciling, and fabric wrapping are beginner-friendly and require no advanced skills. With a little patience, anyone can create something beautiful.
How much does it cost to make large wall art at home?
You can create stunning large wall art for as little as $10–$30 using budget supplies. Repurposing materials from around your home can reduce costs even further.
Can I make large wall art if I rent my home?
Yes! Use removable hanging solutions like Command Strips or lean the art against the wall on a shelf or console table for a no-drill option.
What’s the best way to plan the layout of my wall art?
Measure your wall space, decide on size and style, and sketch a rough idea. For gallery walls, lay out the pieces on the floor first to test the arrangement before hanging.
How do I keep my DIY wall art looking new?
Dust it regularly with a soft cloth, avoid direct sunlight to prevent fading, and consider sealing painted pieces with a clear varnish for protection.