DIY textured wall art ideas for a stunning home makeover
DIY textured wall art is a creative, budget-friendly way to elevate your home decor with depth and visual interest. From clay sculptures to fabric panels, these handmade pieces add unique charm and reflect your personal style effortlessly.
This is a comprehensive guide about diy textured wall art.
Key Takeaways
- Enhance visual depth: Textured wall art adds dimension, making flat walls more dynamic and engaging.
- Affordable customization: Create one-of-a-kind pieces using inexpensive materials like clay, fabric, or recycled items.
- Personal expression: DIY projects let you reflect your taste, mood, and creativity in every design.
- Eco-friendly options: Repurpose old materials like cardboard, wood, or fabric scraps for sustainable decor.
- Beginner-friendly techniques: Many projects require no special tools—just basic supplies and a little imagination.
- Versatile styles: From boho to modern minimalist, textured art fits any interior design theme.
- Easy to update: Swap out pieces seasonally or as your style evolves without breaking the bank.
Why DIY Textured Wall Art Is the Ultimate Home Upgrade
Imagine walking into a room where the walls don’t just hold pictures—they tell a story. That’s the magic of DIY textured wall art. Unlike flat prints or posters, textured pieces invite touch and curiosity. They catch the light differently throughout the day, shifting shadows and highlights that keep your space feeling fresh and alive.
What’s even better? You don’t need to be an artist or spend a fortune to create something stunning. With a few simple materials and a bit of creativity, you can transform blank walls into focal points that spark conversation. Whether you’re refreshing a bedroom, sprucing up a living room, or adding personality to a hallway, textured wall art brings a handmade charm that store-bought decor simply can’t match.
What Is Textured Wall Art—and Why It Works
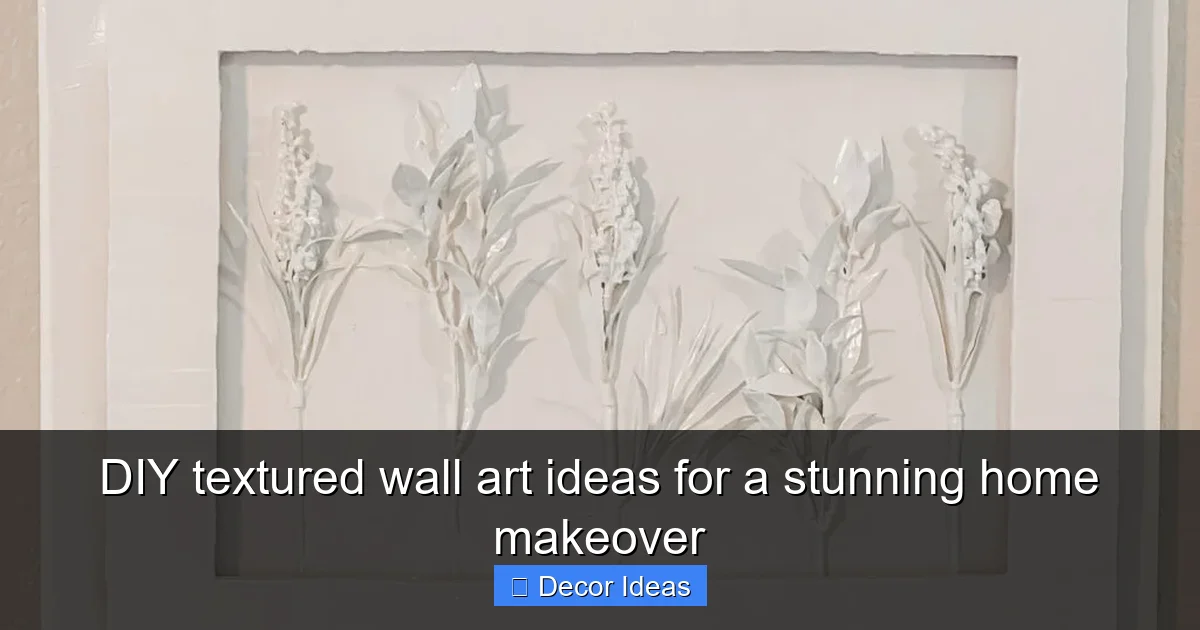
Textured wall art refers to any wall decoration that has a three-dimensional or tactile surface. Unlike smooth paintings or prints, these pieces have bumps, ridges, layers, or raised patterns that create visual and physical depth. Think of a canvas with thick paint swirls, a panel covered in woven fabric, or a sculpture made from clay—each adds a unique sensory experience to your space.
So why does it work so well in home decor? First, texture breaks up monotony. Flat walls can feel sterile or boring, especially in minimalist or modern spaces. Adding texture introduces contrast and interest without overwhelming the room. Second, it plays beautifully with light. As sunlight or lamplight hits the raised areas, it creates soft shadows that shift throughout the day, giving your walls a living, breathing quality.
Finally, textured art feels personal. Because it’s often handmade, it carries a sense of authenticity and care. It’s not mass-produced—it’s *yours*. And that emotional connection makes your home feel more like *you*.
Top Materials for Creating DIY Textured Wall Art
The beauty of DIY textured wall art is that you can use almost anything. The key is choosing materials that are lightweight, easy to shape, and safe to hang. Here are some of the most popular and effective options:
Air-Dry Clay
Air-dry clay is a favorite among crafters because it’s moldable, dries hard, and requires no kiln. You can roll it out, cut shapes, or sculpt free-form designs. Once dry, paint it to match your color scheme. Try making geometric patterns, abstract blobs, or even miniature landscapes. For extra texture, press leaves, lace, or textured stamps into the clay before it dries.
Fabric and Textiles
Fabric adds softness and warmth. Use burlap, linen, velvet, or even old sweaters to create textured panels. Stretch fabric over a wooden frame or glue it onto a canvas. For a boho look, layer different fabrics with fringe, tassels, or embroidery. You can also weave strips of fabric through a wire grid for a macramé-inspired piece.
Recycled Wood and Pallet Pieces
Wood brings natural texture and rustic charm. Cut small pieces from an old pallet or use scrap wood to build a mosaic-style wall hanging. Sand the edges for safety and stain or paint them in contrasting colors. Arrange them in a herringbone pattern, a sunburst, or a random collage for a modern twist.
Paper and Cardboard
Don’t underestimate paper! Layered paper cutouts, rolled paper sculptures, or cardboard relief art can be surprisingly striking. Use old magazines, wrapping paper, or watercolor sheets. Create 3D flowers, geometric shapes, or abstract forms. Seal with Mod Podge to protect and add a slight sheen.
Plaster and Joint Compound
For a more industrial or artistic look, try plaster or joint compound. Apply it directly to a canvas or board with a palette knife, creating swirls, peaks, or smooth gradients. Once dry, paint it with acrylics or leave it natural for a raw, minimalist effect. This technique works great for modern or gallery-style interiors.
Easy DIY Textured Wall Art Projects to Try at Home
Ready to get your hands dirty? Here are five beginner-friendly projects that deliver big impact with minimal effort.
1. Clay Relief Panels
Start with a wooden board or thick canvas. Roll out air-dry clay to about ¼ inch thick and press it onto the surface. Use cookie cutters, stamps, or your fingers to create patterns. Let it dry for 24–48 hours, then paint with acrylics. Seal with a matte varnish to protect the finish. Hang with picture wire or adhesive strips.
2. Fabric-Wrapped Canvas
Choose a bold fabric—think velvet, burlap, or a patterned cotton. Stretch it tightly over a canvas frame and staple it to the back. For extra texture, layer smaller fabric swatches on top using fabric glue. Add buttons, beads, or embroidery for embellishment. This project takes under an hour and looks incredibly luxurious.
3. Paper Flower Wall Hanging
Cut petal shapes from colored paper or cardstock. Curl the edges with a pencil for a natural look. Layer petals to form flowers, then glue them onto a circular cardboard base. Add a stem and leaves, and hang with twine. Group several together for a stunning floral installation.
4. Wood Slice Collage
Collect small wood slices (you can buy them or cut them yourself). Paint or stain them in different colors. Arrange them on a board in a mosaic pattern—think sunbursts, waves, or abstract shapes. Glue them down and seal with a clear coat. This piece brings organic texture and earthy vibes to any room.
5. Plaster Swirl Art
Mix joint compound with a little water until it’s smooth like frosting. Apply it to a canvas using a palette knife, creating swirls, peaks, or smooth gradients. Let it dry completely, then paint with metallic or bold acrylic colors. This technique mimics high-end abstract art and costs just a few dollars.
Tips for Hanging and Styling Your Textured Masterpieces
Creating your art is only half the fun—displaying it properly makes all the difference. Here’s how to hang and style your textured pieces like a pro.
Choose the Right Hardware
Because textured art can be heavier than flat prints, use appropriate hanging hardware. For lightweight pieces (under 5 lbs), adhesive strips or small picture hooks work fine. For heavier items, use wall anchors and sturdy hooks. Always check the weight limit and test the hold before hanging.
Create a Gallery Wall
Mix textured pieces with framed photos, mirrors, or flat art for a dynamic gallery wall. Vary sizes and shapes—round clay discs, rectangular fabric panels, and square wood collages look great together. Use painter’s tape to plan the layout on the floor before committing to nails.
Consider Lighting
Spotlighting your textured art enhances its depth. Use picture lights, track lighting, or even floor lamps to cast soft shadows. Natural light works too—place pieces near windows to see how the texture changes from morning to evening.
Balance with Room Decor
Let your textured art complement, not compete with, your furniture and textiles. If your sofa is already heavily patterned, go for a simpler textured piece. In a minimalist room, a bold clay sculpture can be the perfect statement.
Rotate Seasonally
Keep your space feeling fresh by swapping out art every few months. Store pieces in a dry place and rotate in seasonal colors or themes—warm earth tones in fall, soft pastels in spring.
Common Mistakes to Avoid When Making Textured Wall Art
Even the most creative projects can go sideways if you’re not careful. Here are a few pitfalls to watch out for:
Using Materials That Are Too Heavy
While texture adds depth, overly heavy materials can damage walls or fall unexpectedly. Avoid thick metal, large stones, or dense wood unless you’re using proper wall anchors and studs.
Skipping the Sealant
Porous materials like clay, paper, or fabric can collect dust or fade over time. Always seal your finished piece with a clear varnish, Mod Podge, or fabric protector to keep it looking fresh.
Overcomplicating the Design
More texture doesn’t always mean better. Too many competing elements can make a piece look chaotic. Stick to one or two textures per artwork for a clean, intentional look.
Ignoring Wall Color
Your art should harmonize with the wall behind it. A dark clay piece on a black wall might disappear, while a white plaster swirl on a white wall could lack contrast. Test your piece against the wall before finalizing.
Rushing the Drying Process
Air-dry clay, plaster, and glue need time to cure. Rushing can cause cracking, warping, or weak adhesion. Follow drying instructions carefully and be patient.
Conclusion: Make Your Walls Come Alive
DIY textured wall art is more than just a decor trend—it’s a way to infuse your home with personality, creativity, and warmth. Whether you’re sculpting with clay, weaving with fabric, or building with wood, each piece becomes a reflection of your unique style. And the best part? It’s affordable, accessible, and deeply satisfying to create something beautiful with your own hands.
So grab some supplies, clear a workspace, and let your imagination run wild. Your walls are waiting to tell a story—make it a textured one.
Quick Answers to Common Questions
What is the easiest DIY textured wall art for beginners?
The fabric-wrapped canvas is the easiest—just stretch fabric over a canvas and staple it down. No drying time, no mess, and it looks instantly professional.
Can I make textured wall art without painting?
Absolutely! Use natural materials like wood slices, clay, or fabric in their raw form. The texture alone adds visual interest without needing paint.
How do I hang heavy textured art safely?
Use wall anchors and sturdy hooks rated for the weight. For very heavy pieces, anchor into a wall stud or use a French cleat system for extra support.
What’s the best material for a modern look?
Plaster or joint compound works great for modern styles. Apply it in smooth gradients or sharp geometric patterns for a sleek, gallery-inspired effect.
Can kids help make textured wall art?
Yes! Kids love working with clay, paper, and fabric. Supervise with glue and tools, but let them shape, paint, and create—it’s a fun family project.
🎥 Related Video: DIY Textured Wall Art | Modern + Minimal Wall Decor Ideas
📺 GJ Home Designs
Frequently Asked Questions
What materials do I need to start making DIY textured wall art?
Basic supplies include air-dry clay, fabric, canvas or wood panels, glue, paint, and tools like scissors or a palette knife. Most items are affordable and available at craft stores.
How long does it take to make a piece of textured wall art?
Simple projects like fabric-wrapped canvases take under an hour. Clay or plaster pieces may need 24–48 hours to dry completely before painting or hanging.
Can I sell my DIY textured wall art?
Yes! Many crafters sell their handmade textured art on platforms like Etsy. Just ensure your designs are original and use high-quality materials for durability.
Will textured wall art damage my walls?
Not if hung properly. Use appropriate hardware and avoid overly heavy materials. For rental homes, consider adhesive strips or freestanding displays.
How do I clean dust off textured wall art?
Use a soft brush or microfiber cloth to gently wipe surfaces. For fabric pieces, a lint roller works well. Avoid water unless the material is sealed.
Can I mix different textures in one piece?
Yes, but keep it balanced. Combine two textures max—like clay and fabric—to avoid visual clutter. Let one element be the focal point.