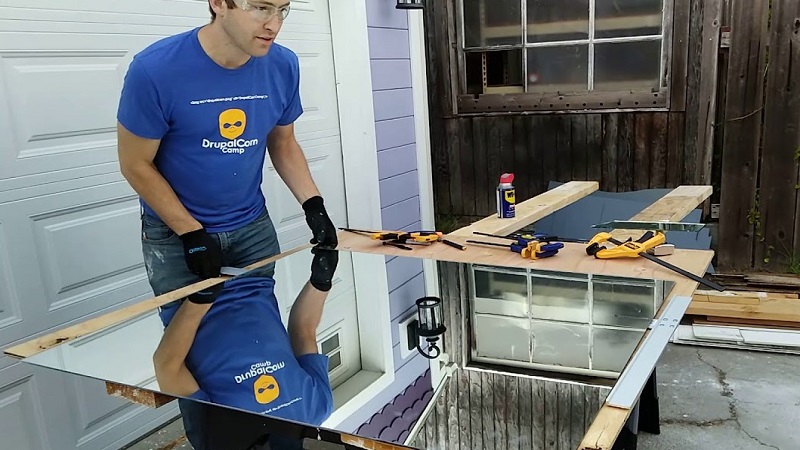
How Can You Cut a Mirror? [Learn The Most Easy Way To Do It]
Wondering how can you cut a mirror safely and accurately in your own home? While it might seem intimidating, scoring and snapping a mirror requires only a few basic tools, a steady hand, and careful attention to safety. By following the correct steps from preparation to finishing the edges, you can achieve clean results without professional help.
Have you ever found the perfect mirror, only to realize it is just a fraction of an inch too wide for your frame? Or perhaps you are working on a fun DIY home decor project and want to repurpose an old wall mirror. Whatever your reason, figuring out how can you cut a mirror on your own is a very rewarding skill to learn. Many people assume that cutting glass requires a professional glass shop, but with the right tools and a bit of patience, you can easily tackle this task right in your own garage or workshop.
When thinking about how can you cut a mirror, the secret lies in understanding how glass behaves. You are not actually slicing through the material like a knife through butter. Instead, you are creating a microscopic fracture line on the surface, which allows you to cleanly snap the glass along that path. It sounds a little scary at first, but once you get the hang of the scoring and snapping method, it is surprisingly simple and deeply satisfying.
In this comprehensive guide, we will walk you through everything you need to know. From gathering your safety gear and essential supplies to mastering the scoring technique and smoothing the edges, you will soon feel like a true glass artisan. Let us dive right in and explore the step-by-step process of how can you cut a mirror safely and successfully.
Key Takeaways
- Safety First: Always wear heavy work gloves and safety glasses to protect yourself from sharp glass shards and flying fragments.
- Right Tools: You will need a quality carbide-wheel glass cutter, cutting oil, a straightedge, and a sturdy flat work surface.
- The Score Line: Score the mirror glass only once with firm, even pressure. Never retrace your score line, or you will ruin the cutting wheel.
- Applying Pressure: Snap the mirror along the score line by placing a dowel or coat hanger underneath and pressing down firmly on both sides.
- Edge Finishing: Smooth out the sharp, freshly cut edges using fine-grit sandpaper or a rubbing stone to prevent accidental cuts.
- Practice Matters: If you are a beginner, practice your scoring technique on a cheap piece of regular window glass before trying it on a mirror.
Gathering Your Tools and Safety Gear
Before you begin any glass-cutting project, you must prioritize your safety. Glass is notoriously sharp, and accidents can happen even to the most careful DIYers. Taking a few minutes to set up your workspace properly will save you from potential injuries and frustration.
Essential Safety Equipment
When you ask yourself how can you cut a mirror, safety should always be your very first thought. You must protect your eyes and hands at all times. Put on a sturdy pair of thick work gloves to protect your fingers from sharp edges. Always wear safety glasses to shield your eyes from tiny glass splinters that might fly up during the snapping process. It is also a smart idea to wear long sleeves and closed-toe shoes just in case a piece of glass falls to the floor.
Required Tools and Supplies
Having the right tools makes all the difference between a clean break and a shattered mess. Here is what you will need to gather before you start:
- A quality pencil-style carbide-wheel glass cutter
- Light machine oil, kerosene, or even sewing machine oil for lubrication
- A sturdy wooden dowel, pencil, or wire coat hanger
- A long, rigid metal straightedge or ruler
- C-clamps to hold your straightedge securely in place
- A clean, flat, and stable work table
- Fine-grit wet/dry sandpaper or a glass rubbing stone
- Measuring tape and a permanent marker
Preparing the Mirror for Cutting
Preparation is the backbone of any successful DIY project. If your mirror is not clean and your measurements are not accurate, your final cut will not fit where you want it to go. Take your time during this phase to set yourself up for success.
Cleaning the Surface
Start by wiping down the mirror surface thoroughly with glass cleaner and a lint-free cloth. Any dust, dirt, or old adhesive residue on the glass can cause your glass cutter to skip or bounce off course. A smooth, clean surface ensures that your cutting wheel makes uninterrupted contact with the glass every single time.
Taking Accurate Measurements
Measure the space where your mirror needs to go, and then measure your mirror twice to be completely certain. Use a permanent marker to make small tick marks at both ends of your intended cut line. Remember the old carpentry adage: measure twice, cut once. Once you snap a mirror, there is no going back to a larger size.
Setting Up the Straightedge
Align your metal straightedge so that it connects your two marker dots. Keep in mind that the cutting wheel on your glass cutter sits slightly away from the edge of the tool. Most standard glass cutters require you to offset your straightedge by about one-16th to one-eighth of an inch, depending on the specific model. Check your tool instructions to confirm the exact offset distance. Once aligned, clamp the straightedge down firmly with your C-clamps so it cannot slip while you work.
Mastering the Scoring Technique
This is the most critical step in learning how can you cut a mirror. Scoring is the act of creating that vital fracture line on the glass surface. If your score is weak or uneven, the mirror will not snap cleanly along your desired path.
Lubricating the Cutting Wheel
Before you touch the mirror, dip the tip of your glass cutter into your cutting oil or kerosene. The oil lubricates the small carbide wheel, allowing it to roll smoothly across the glass rather than skidding and scratching the surface. Re-dip the cutter in oil for every single cut you make.
Scoring the Glass Properly
Hold the glass cutter like a pencil, keeping it completely upright and perpendicular to the mirror surface. Place the tip against the glass at the starting edge, press down with firm and steady pressure, and push the cutter away from you in one continuous, fluid motion. You should hear a distinct, satisfying scratching or zipping sound as the wheel scores the glass.
Important rule of thumb: never, ever go back and retrace your score line. If you try to score the same line a second time, the tiny cutting wheel will get misaligned, and it will dull or chip the wheel instantly. One smooth, confident pass is all you need.
Snapping the Mirror Along the Score Line
Once you have successfully scored your line, you are ready for the exciting and slightly nerve-wracking part: snapping the glass. This step separates the amateurs from the pros, but it is actually quite simple once you understand the physics behind it.
Positioning the Dowel
Take your wooden dowel, pencil, or a piece of a wire coat hanger and place it on your workbench directly underneath your score line, running parallel to it. Gently lift the edges of the mirror so that the score line sits directly above the dowel. The dowel acts as a fulcrum point, giving the glass somewhere to pivot when pressure is applied.
Applying Downward Pressure
Place your hands on either side of the score line. Apply gentle, even downward pressure with the palms of your hands. Within a second or two, you will hear a sharp crack as the fracture travels cleanly along your entire score line, separating the two pieces of mirror. If it does not snap immediately, apply just a tiny bit more pressure, but do not force it violently.
If you are cutting a very narrow strip off the edge of a large mirror, you can skip the dowel and instead use running pliers. Simply align the jaws of the running pliers with the edge of the score line and squeeze gently until the glass snaps off.
Finishing and Smoothing the Edges
Congratulations, you have successfully cut your mirror! However, your job is not quite finished yet. Freshly cut glass edges are razor-sharp and can easily cause nasty cuts if you handle them carelessly.
Removing Sharp Edges
Take your fine-grit wet/dry sandpaper or a glass rubbing stone and gently rub it along the freshly cut edges of the mirror. It is best to do this while wearing your work gloves and wetting the sandpaper slightly to keep glass dust out of the air. Rub at a slight angle to dull the razor-sharp corner.
Cleaning Up the Final Piece
Wipe down your newly sized mirror with a damp cloth to remove any glass dust, oils, and marker residue. Check the edges to ensure they feel smooth to the touch. Your custom-cut mirror is now ready to be installed in its frame, glued to a wall, or used in your latest craft project.
Conclusion
Learning how can you cut a mirror is an empowering DIY skill that saves you both time and money. While it requires a bit of caution, concentration, and the proper tools, the process is straightforward enough for almost anyone to master. By prioritizing your safety, taking precise measurements, and executing a clean score-and-snap technique, you can achieve professional-looking results right at home. The next time you find yourself needing a custom-sized mirror, skip the expensive custom glass shop, grab your glass cutter, and tackle the project with confidence.
Frequently Asked Questions
Can you cut a mirror with a regular glass cutter?
Yes, a standard pencil-style carbide-wheel glass cutter designed for regular window glass works perfectly fine for cutting mirrors. The key is to score the glass side of the mirror, not the reflective backing side.
Should you cut a mirror from the glass side or the back?
You must always score the glass from the front reflective side, never from the painted backing. Scoring from the front ensures your cutting wheel makes direct contact with the smooth glass surface for an accurate break.
What do I do if the mirror does not snap cleanly along the line?
If the mirror fails to snap on the first try, do not try to retrace your score line. Instead, reposition your dowel slightly or use glass running pliers to gently apply pressure along the score until the break completes.
Can I cut a mirror without using any oil?
While you technically can score glass dry, using a drop of cutting oil or kerosene is strongly recommended. Lubrication helps the cutting wheel roll smoothly, prevents skipping, and extends the lifespan of your tool.
How do you smooth the sharp edges after cutting?
You can easily smooth razor-sharp glass edges using fine-grit wet sandpaper, a carborundum stone, or a specialized glass rubbing stone. Always wear protective gloves and keep the sandpaper damp to control glass dust.
Is it harder to cut a thick mirror compared to a thin one?
Thicker mirrors require a bit more firm, confident pressure when scoring and snapping, but the fundamental technique remains exactly the same. Beginners should start with thinner, standard-thickness mirrors for easier handling.